
ARI QuickStart Guide
This guide walks you through installing ARI, choosing an AI model, and running your first experiment using the web dashboard. No programming experience is required.
For CLI (command-line) usage, see CLI Reference.
Preview before you install
- 🎬 Dashboard demo video —
movie/en/ari_dashboard_demo.mp4shows the full web UI in action.- 📄 Sample output paper —
sample_paper.pdfis a real 8-page paper generated by ARI on an aarch64 (SVE) HPC platform: a CSR SpMM study (store-policy selection across RHS widths, loopline-guided performance model, every claim gate-verified) with figures, citations, and the reproducibility verification report.
What You Will Need
| Requirement | Details |
|---|---|
| Operating System | Linux or macOS (Windows: use WSL2) |
| Python | 3.10 or later |
| Git | To clone the repository |
| Web browser | Chrome, Firefox, Safari, or Edge |
Optional (but recommended):
| Tool | Why |
|---|---|
| conda / miniconda | Easier LaTeX and PDF tool installation (no sudo needed) |
| Ollama | Run AI models locally for free — no API key, no cost |
| LaTeX | Required only if you want ARI to generate PDF papers |
Step 1: Install ARI
Open a terminal and run:
git clone https://github.com/kotama7/ARI.git
cd ARI
bash setup.sh
The setup script automatically detects your OS and installs everything needed. It works on Linux, macOS, and WSL2 — with or without conda and sudo.
In v0.6.0 the setup script also bootstraps Letta (the memory backend used by ari-skill-memory). It auto-detects the best deployment path: Docker → Singularity/Apptainer → pip. To skip the Letta bootstrap (for example in CI or container builds) export SKIP_LETTA_SETUP=1 before running bash setup.sh. To run setup non-interactively, export ARI_NONINTERACTIVE=1.
When setup finishes, you will see "Setup Complete" and next-step instructions. You can verify Letta later with ari memory health.
Step 2: Choose Your AI Model
ARI needs an AI model (LLM) to think, plan, and run experiments. Choose one of the following:
Option A: Ollama — Free, runs on your computer (recommended)
No account needed. No API key. No cost. Everything runs locally.
# Install Ollama
curl -fsSL https://ollama.com/install.sh | sh     # Linux
# brew install ollama                              # macOS

# Download a model
ollama pull qwen3:8b

# Start the server (keep this terminal open)
ollama serve
Set environment variables (open a new terminal):
export ARI_BACKEND=ollama
export ARI_MODEL=qwen3:8b
Which model size?
Model RAM needed Quality qwen3:8b16 GB Good — great for getting started qwen3:14b32 GB Better qwen3:32b64 GB Best
Option B: OpenAI API (cloud, paid)
export ARI_BACKEND=openai
export ARI_MODEL=openai/gpt-4o
export OPENAI_API_KEY=sk-...     # Get from https://platform.openai.com/api-keys
Option C: Anthropic API (cloud, paid)
export ARI_BACKEND=claude
export ARI_MODEL=anthropic/claude-sonnet-4-5
export ANTHROPIC_API_KEY=sk-ant-...  # Get from https://console.anthropic.com/
Tip: Add
exportlines to your~/.bashrcor~/.zshrcto make them permanent.
Step 3: Launch the Dashboard
Start every long-running service (Letta memory backend, ari-registry, and the Viz GUI) with the one-shot launcher at the repo root:
./start.shThis restarts all three on every invocation (PIDs live under ~/.ari/). Useful subcommands: ./start.sh gui (just the GUI), ./start.sh status (health check), ./start.sh stop or ./shutdown.sh (tear everything down — shutdown.sh also reaps apptainer-orphaned postgres/redis).
Open your browser and go to: http://localhost:8765
You will see the ARI home screen:
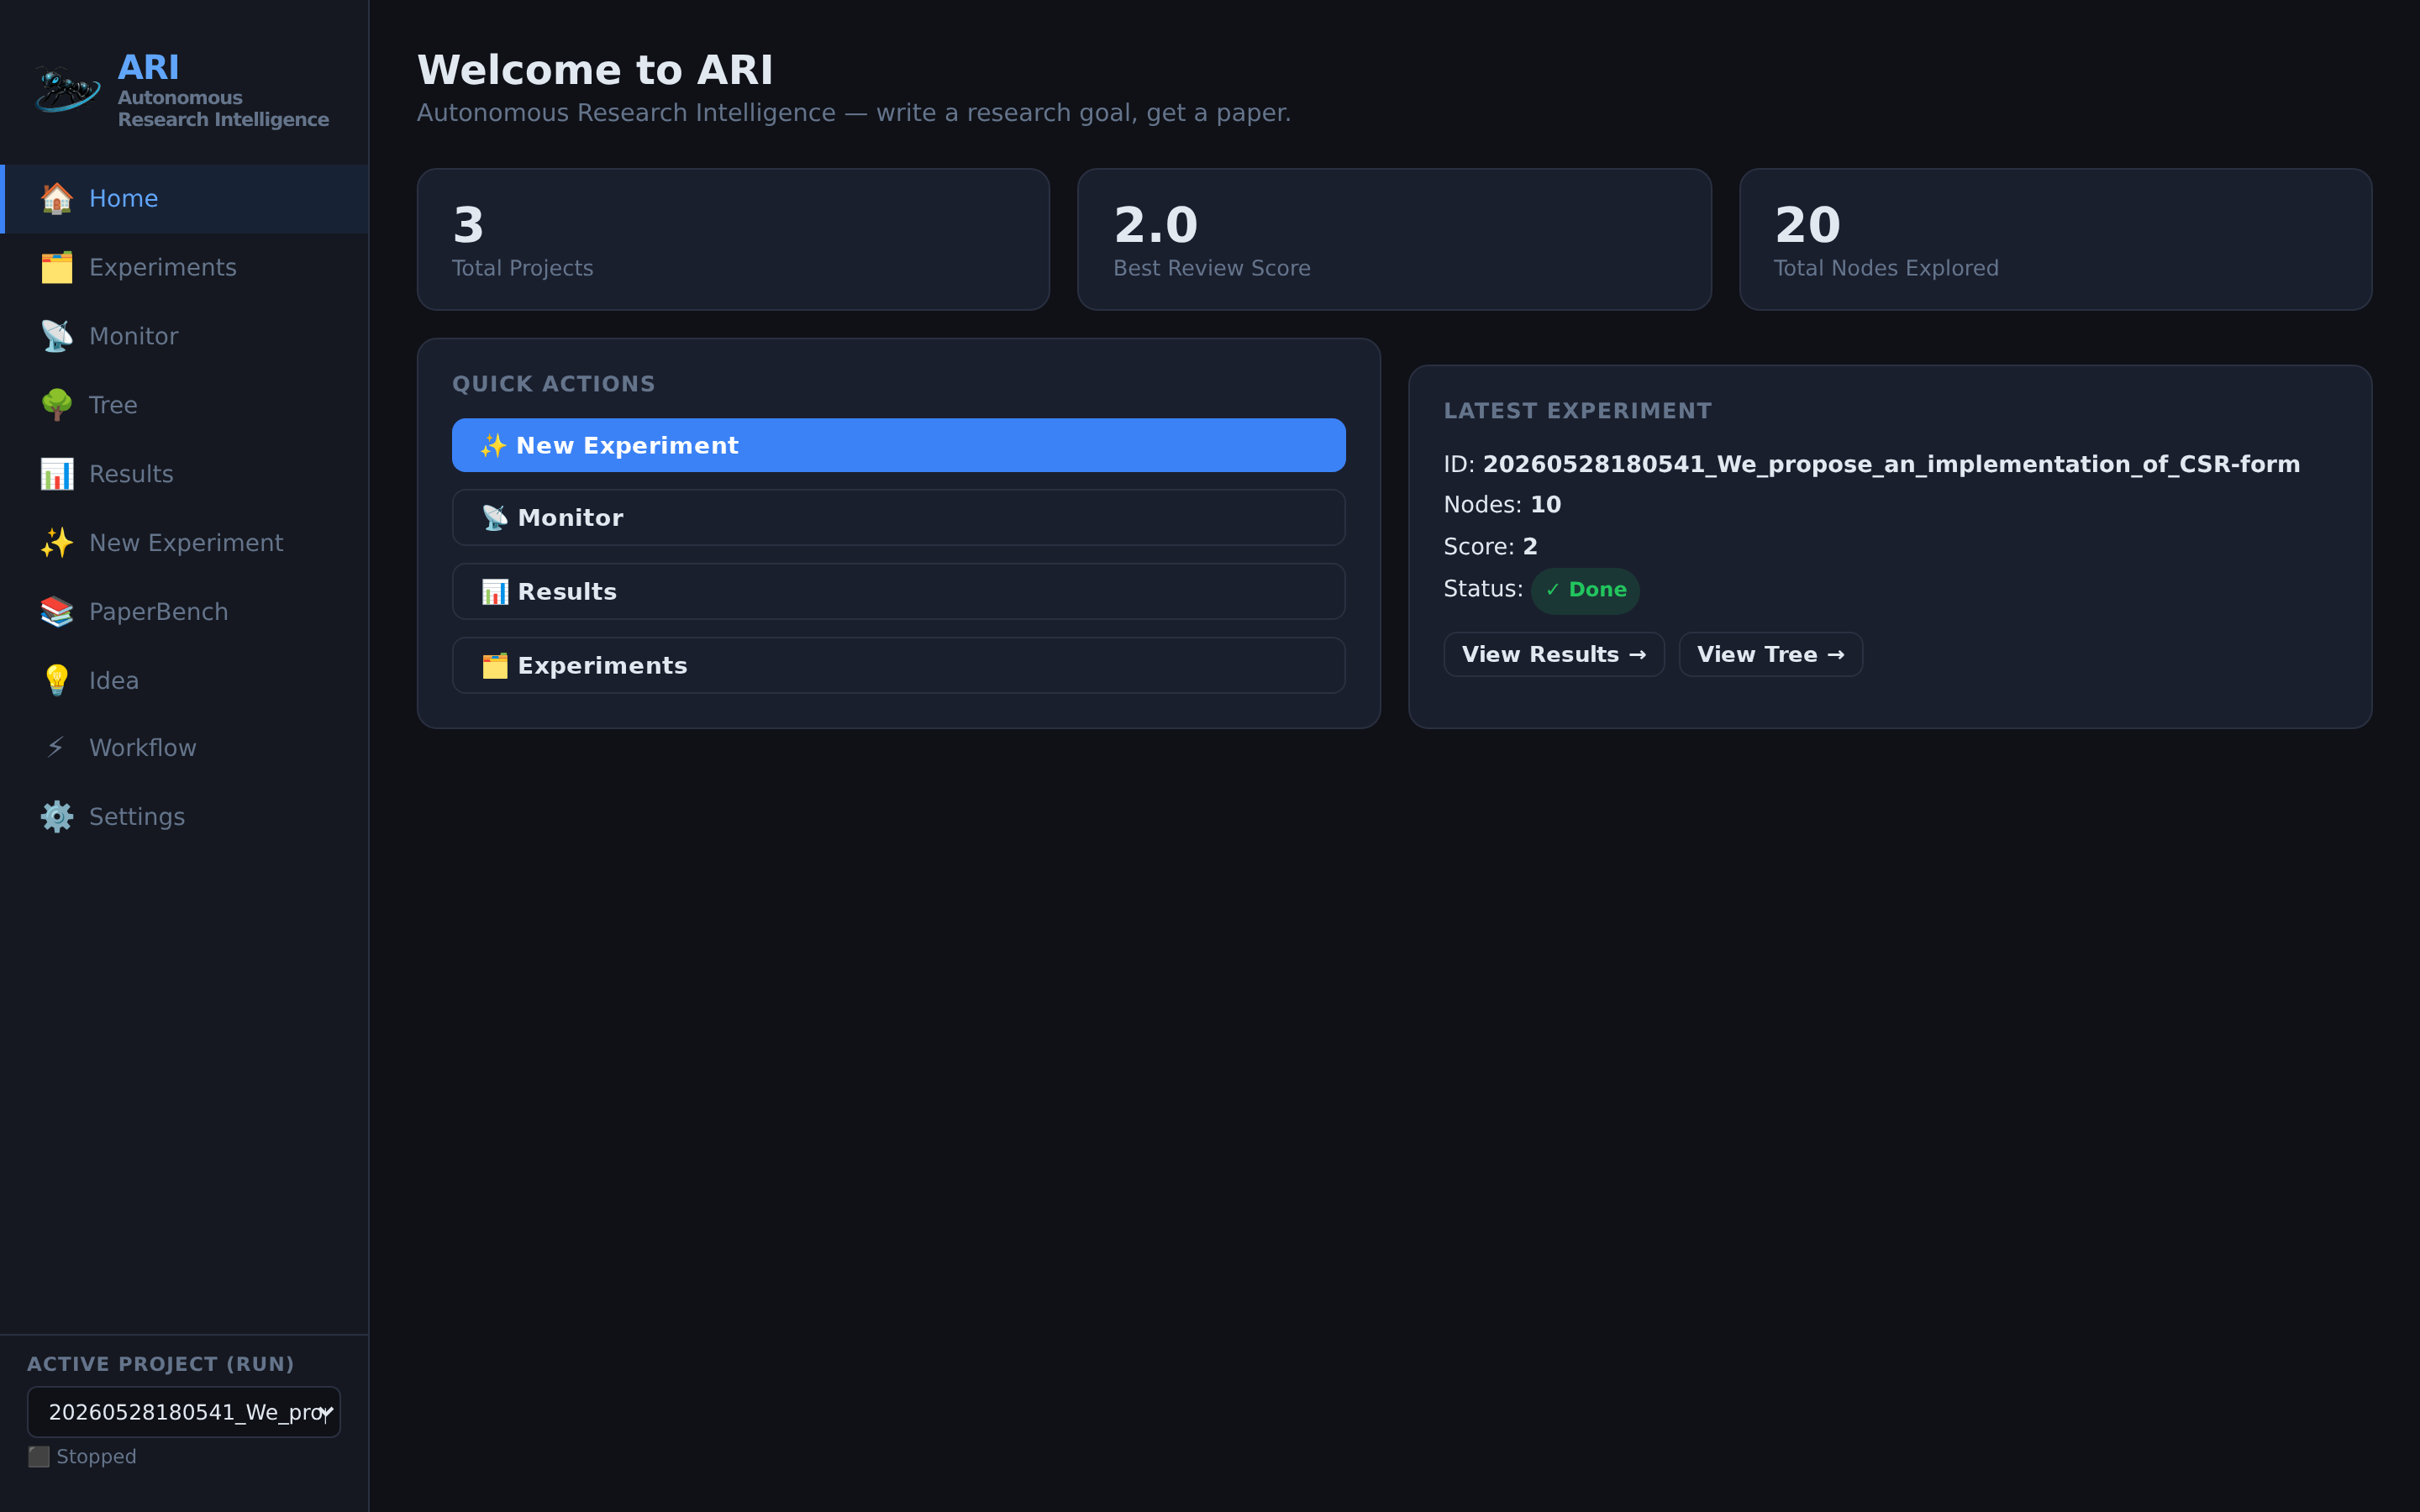
The left sidebar provides navigation to all dashboard pages:
| Page | Description |
|---|---|
| Home | Overview with quick actions and recent experiments |
| Experiments | List of all past experiment runs |
| Monitor | Real-time pipeline progress with D3 tree visualization |
| Tree | Full BFTS experiment tree — click nodes to inspect details |
| Results | Overleaf-like LaTeX editor, paper PDF viewer, review report, EAR browser |
| New Experiment | Wizard to create and launch a new experiment |
| Ideas | VirSci-generated research hypotheses |
| Workflow | React Flow visual DAG editor for pipeline stages |
| Settings | Configure LLM, API keys, SLURM, container, VLM, retrieval backend |
| Sub-Experiments | Recursive sub-experiment tree (via orchestrator skill) |
Step 4: Create Your First Experiment (Wizard)
Click "New Experiment" in the sidebar (or the blue "New Experiment" button on the home page).
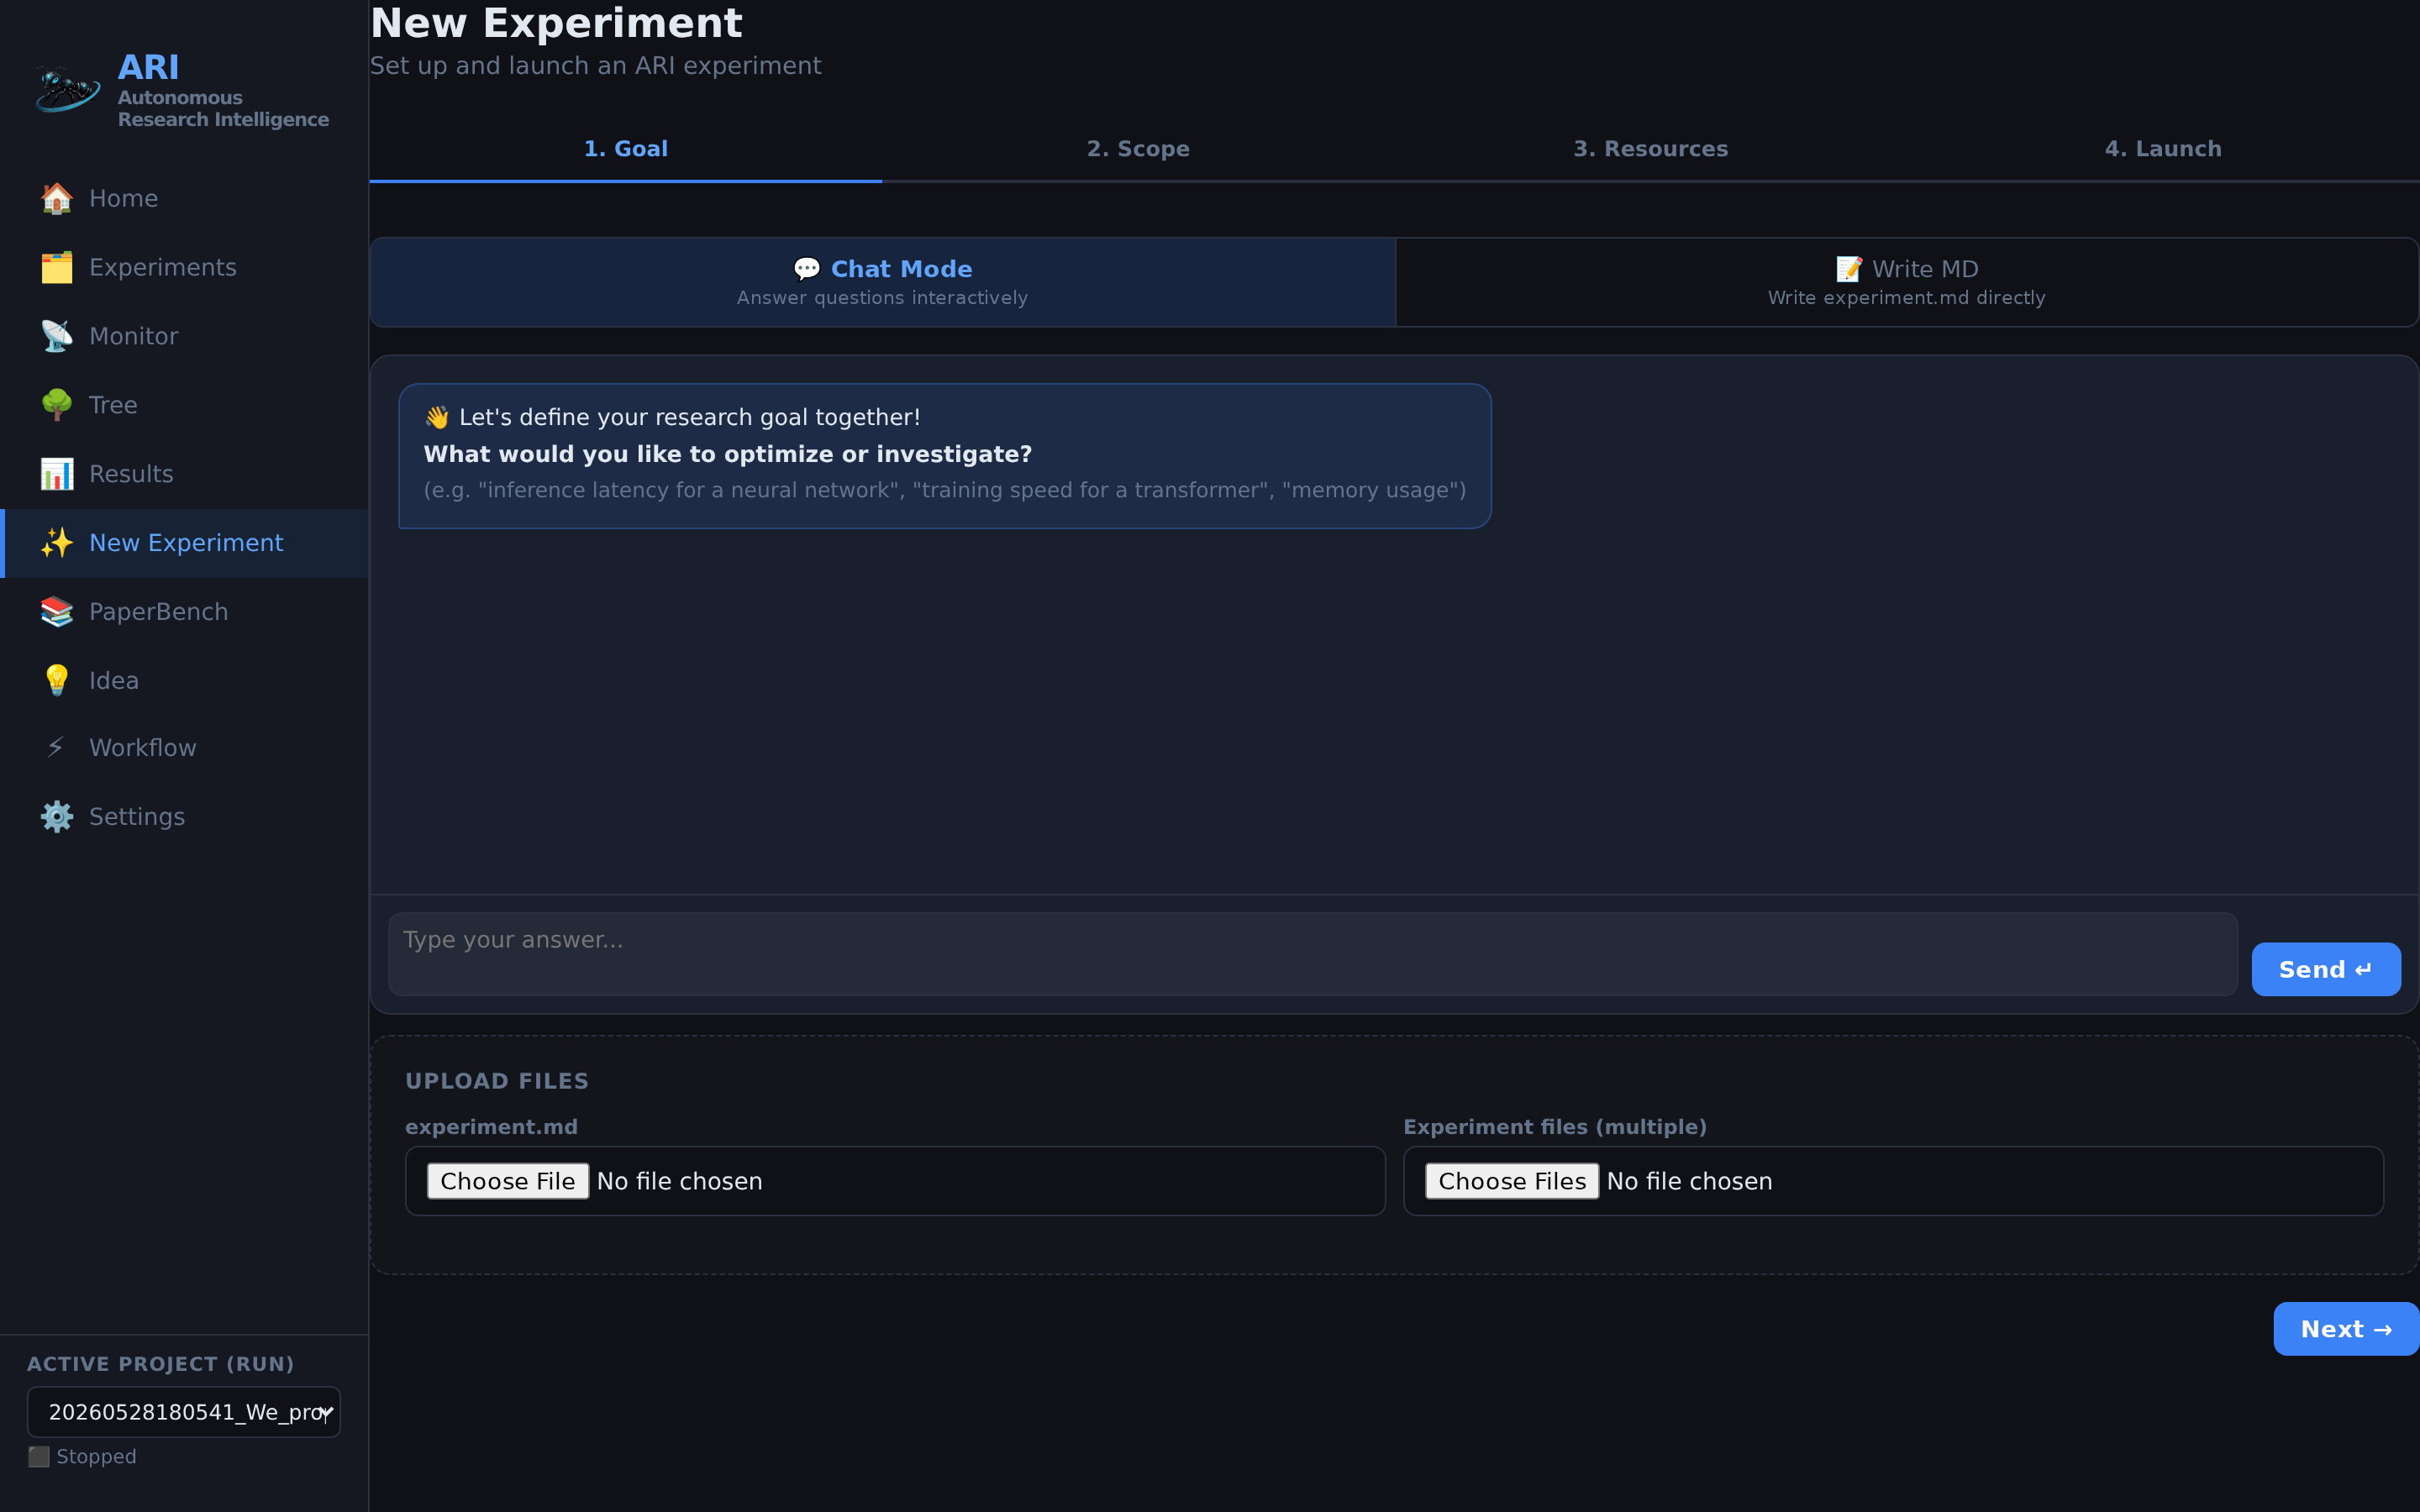
The wizard guides you through 4 steps:
Step 1 of 4 — Choose Mode
| Mode | Best for |
|---|---|
| Chat | Beginners. Describe what you want in natural language. The AI helps you refine it into a proper experiment. |
| Write MD | Write or paste your experiment description in Markdown directly. |
| Upload | Upload an existing experiment.md file from your computer. |
Recommended for beginners: Chat mode. Just type what you want to optimize or investigate, for example:
"I want to find the best configuration for my experiment on this machine"
The AI will ask clarifying questions and generate the experiment file automatically.
Step 2 of 4 — Scope
Configure how large the experiment should be:
| Setting | What it controls | Recommended for first run |
|---|---|---|
| Max Depth | How deep the search tree goes | 3 |
| Max Nodes | Total number of experiments to run | 5–10 |
| Max ReAct Steps | Reasoning steps per experiment | 80 (default) |
| Timeout | Seconds per experiment | 7200 (default) |
| Parallel Workers | Simultaneous experiments | 2–4 |
Tip: Start small (5–10 nodes, depth 3) for your first run. You can always increase later.
Step 3 of 4 — Resources
Select your LLM provider and model:
- OpenAI / Anthropic / Ollama / Custom — choose from the dropdown
- For Ollama, you can type any model name (e.g.,
qwen3:8b) - Configure SLURM/HPC settings if running on a cluster
Paper Review (v0.6.0+) — choose how the generated paper is reviewed:
- Rubric — pick one of 16 bundled venues (
neuripsdefault and v2-compatible, plusiclr,icml,cvpr,acl,sc,osdi,usenix_security,stoc,siggraph,chi,icra,nature,journal_generic,workshop,generic_conference). Drop your own YAML intoari-core/config/reviewer_rubrics/to add a custom venue. - Few-shot mode —
static(use the bundled examples) ordynamic(Phase 2 OpenReview retrieval; falls back to static for closed-review venues). - Reviewer ensemble (N) — number of independent reviewer agents. N>1 also runs an Area Chair meta-review.
- Reflection rounds — self-reflection iterations per reviewer (Nature Ablation default: 5).
- Few-shot examples — auto-sync from the manifest, upload your own JSON+PDF samples, or delete unwanted ones — directly from the wizard.
Step 4 of 4 — Launch
Review your settings and click Launch. ARI will:
- Search related academic papers
- Generate research hypotheses (VirSci multi-agent deliberation)
- Run experiments using Best-First Tree Search
- Evaluate results with LLM peer review
- Write a LaTeX paper with figures and citations
- Verify reproducibility independently
Step 5: Monitor the Experiment
Once launched, the Monitor page shows real-time progress:
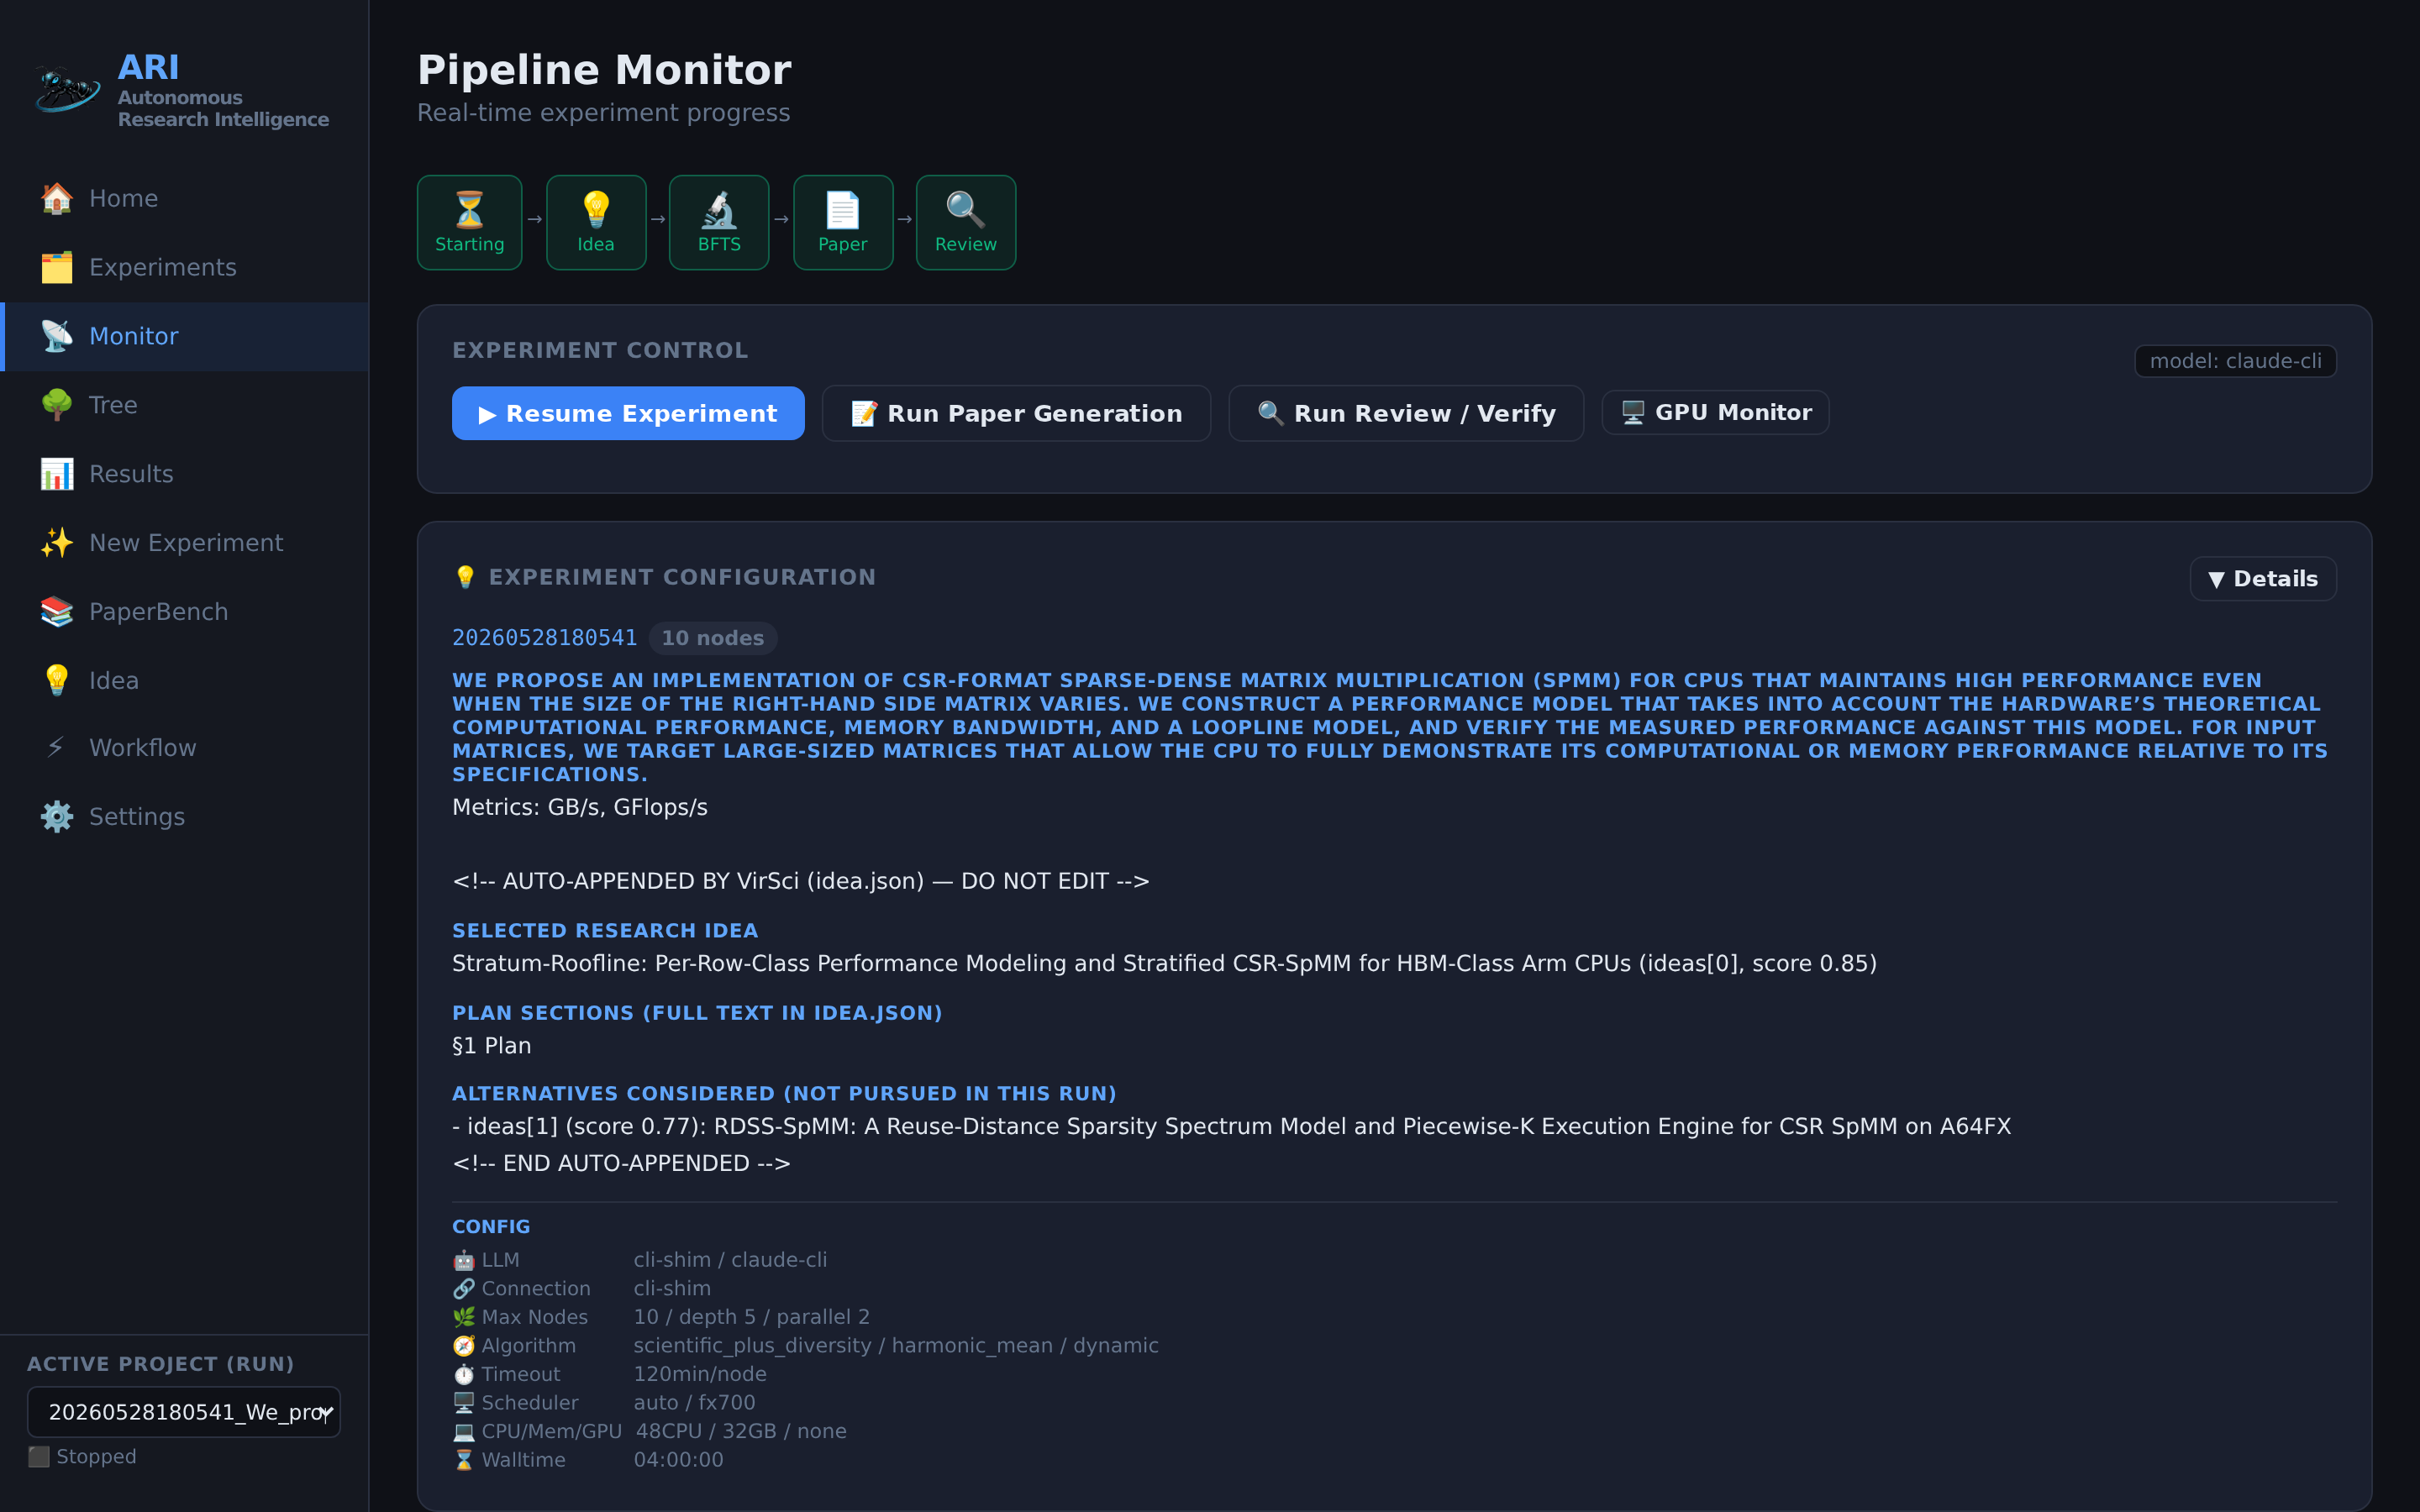
- Pipeline stages are shown at the top (Idea → BFTS → Paper → Review)
- Node tree shows experiment progress with color-coded status
- Logs stream in real time
Experiment Tree
Click Tree in the sidebar for the full interactive experiment tree:
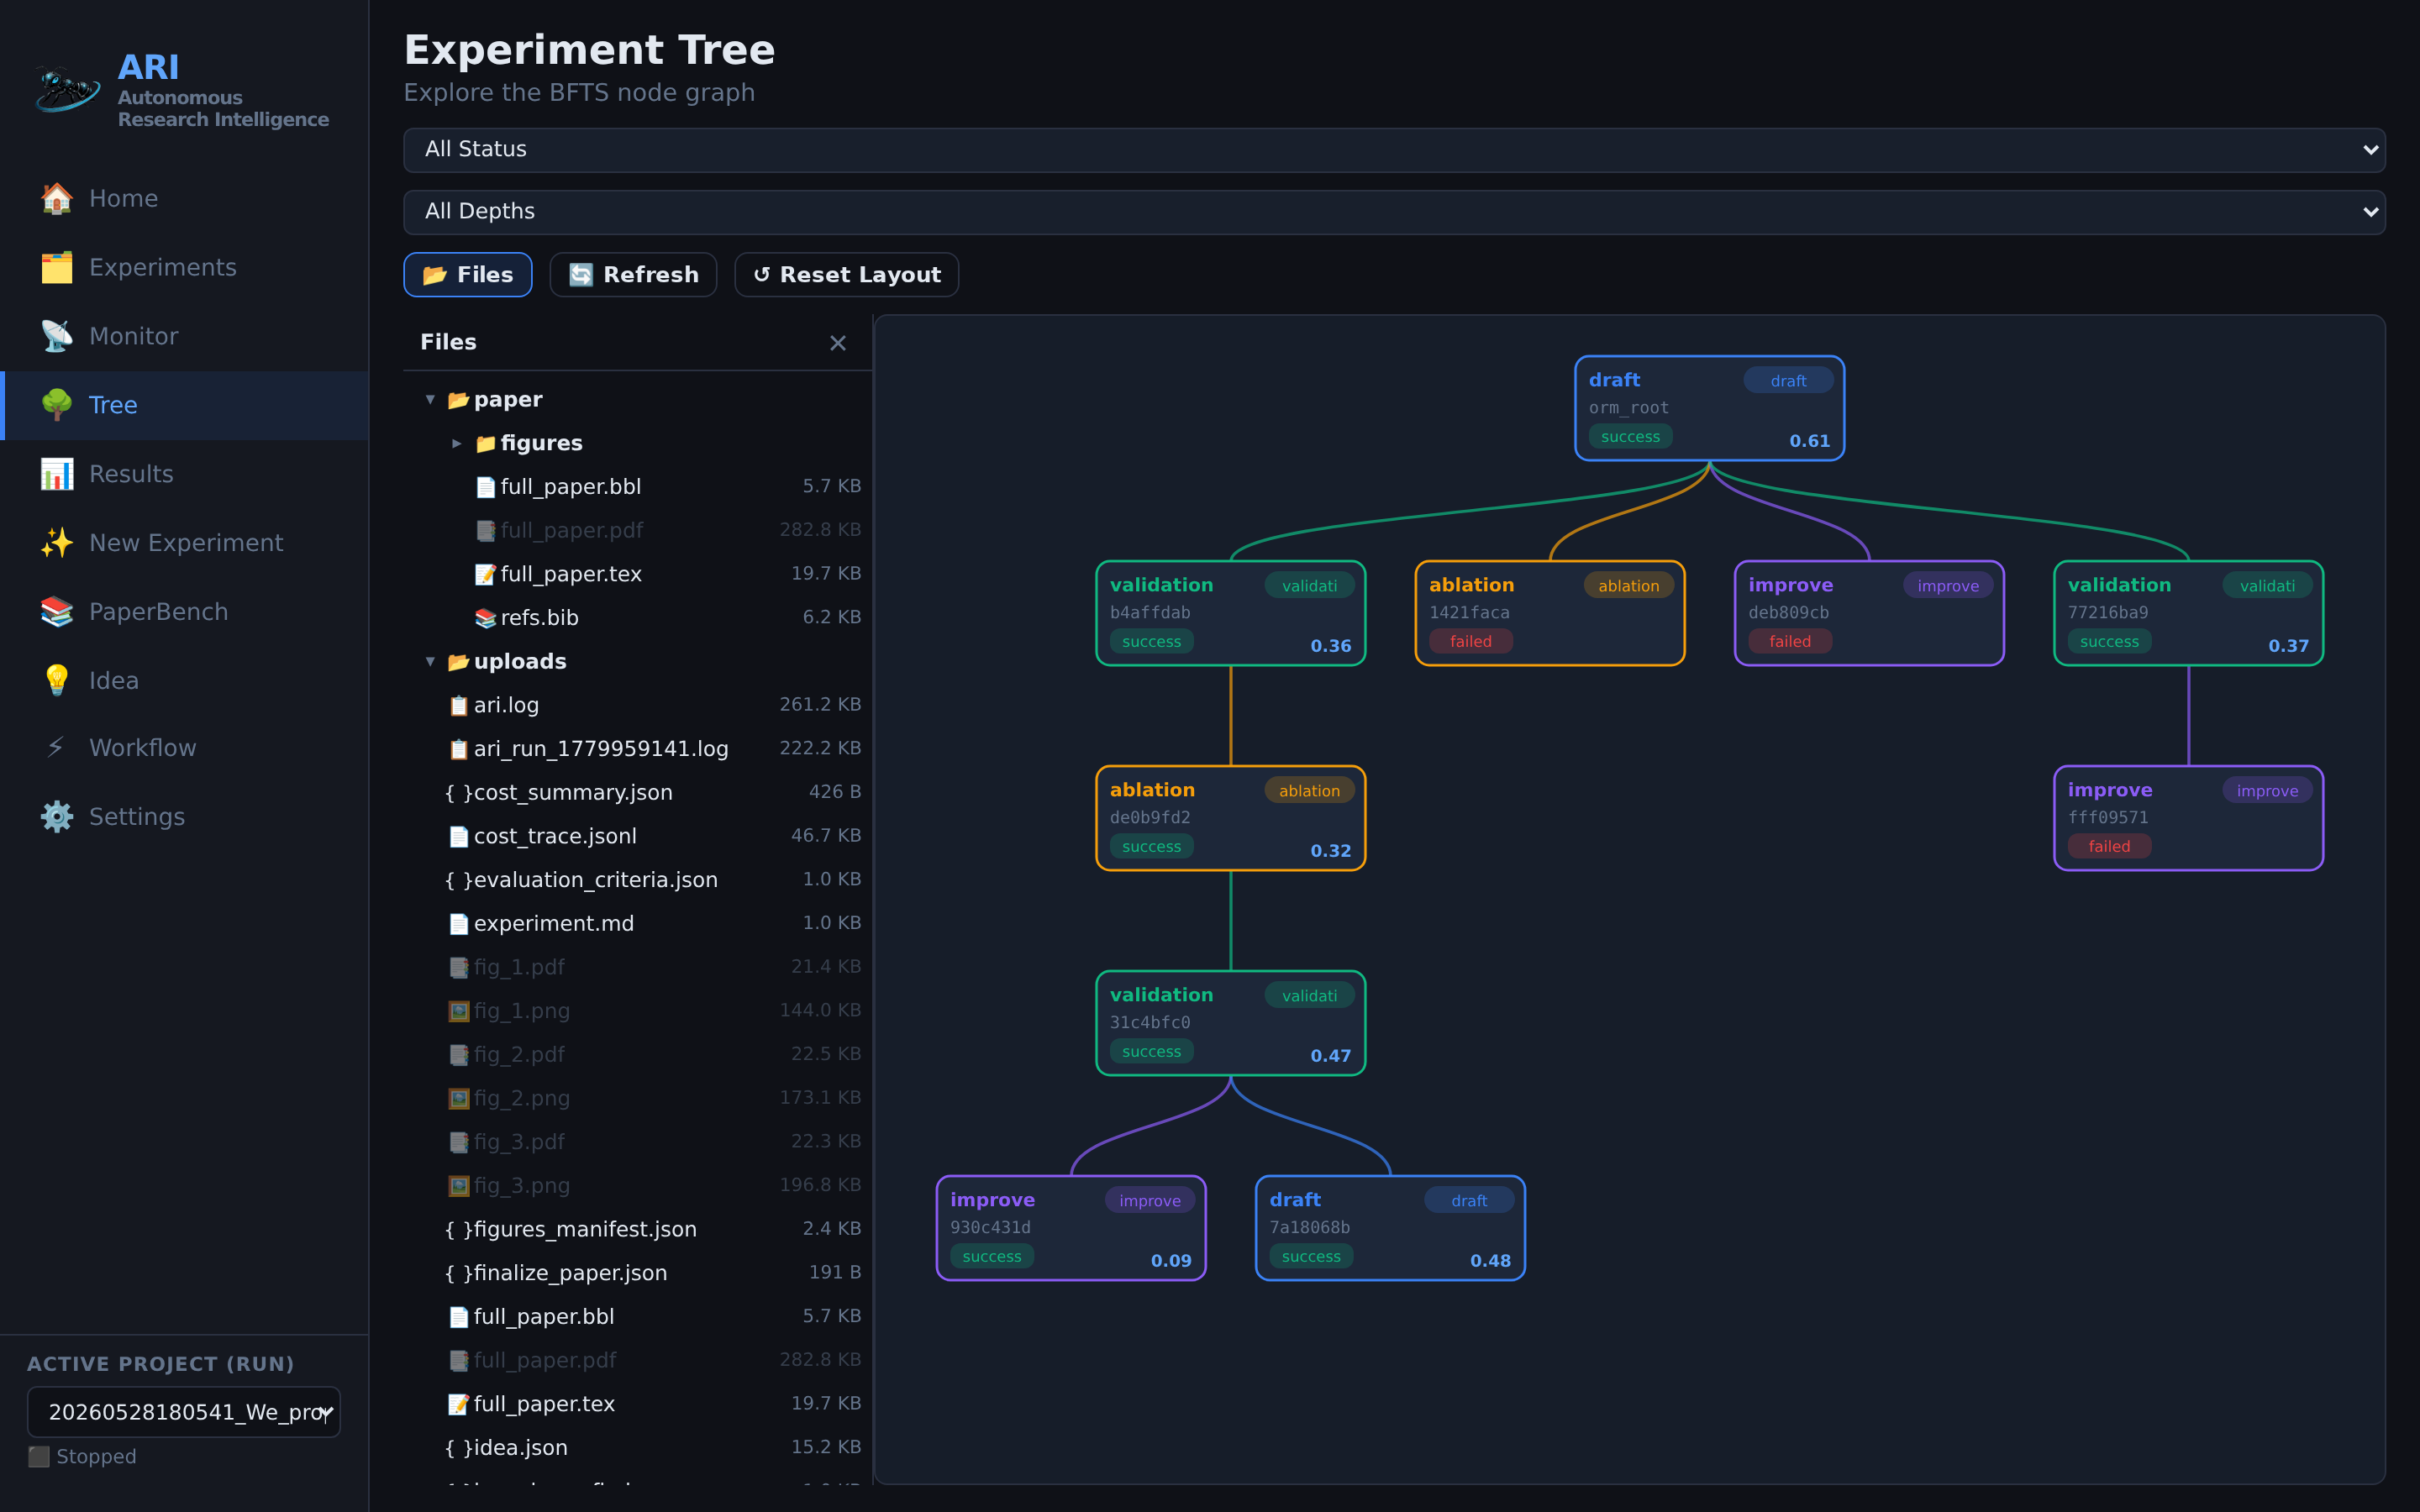
- Green nodes = success
- Red nodes = failed
- Blue nodes = running
- Grey nodes = pending
Click any node to inspect:
| Tab | What it shows |
|---|---|
| Overview | Status, metrics, execution time, evaluation summary |
| Trace | Every tool call the AI agent made (step by step) |
| Code | Generated source code for this experiment |
| Output | Job stdout, benchmark results |
Step 6: View Results
After the experiment completes, go to the Results page:
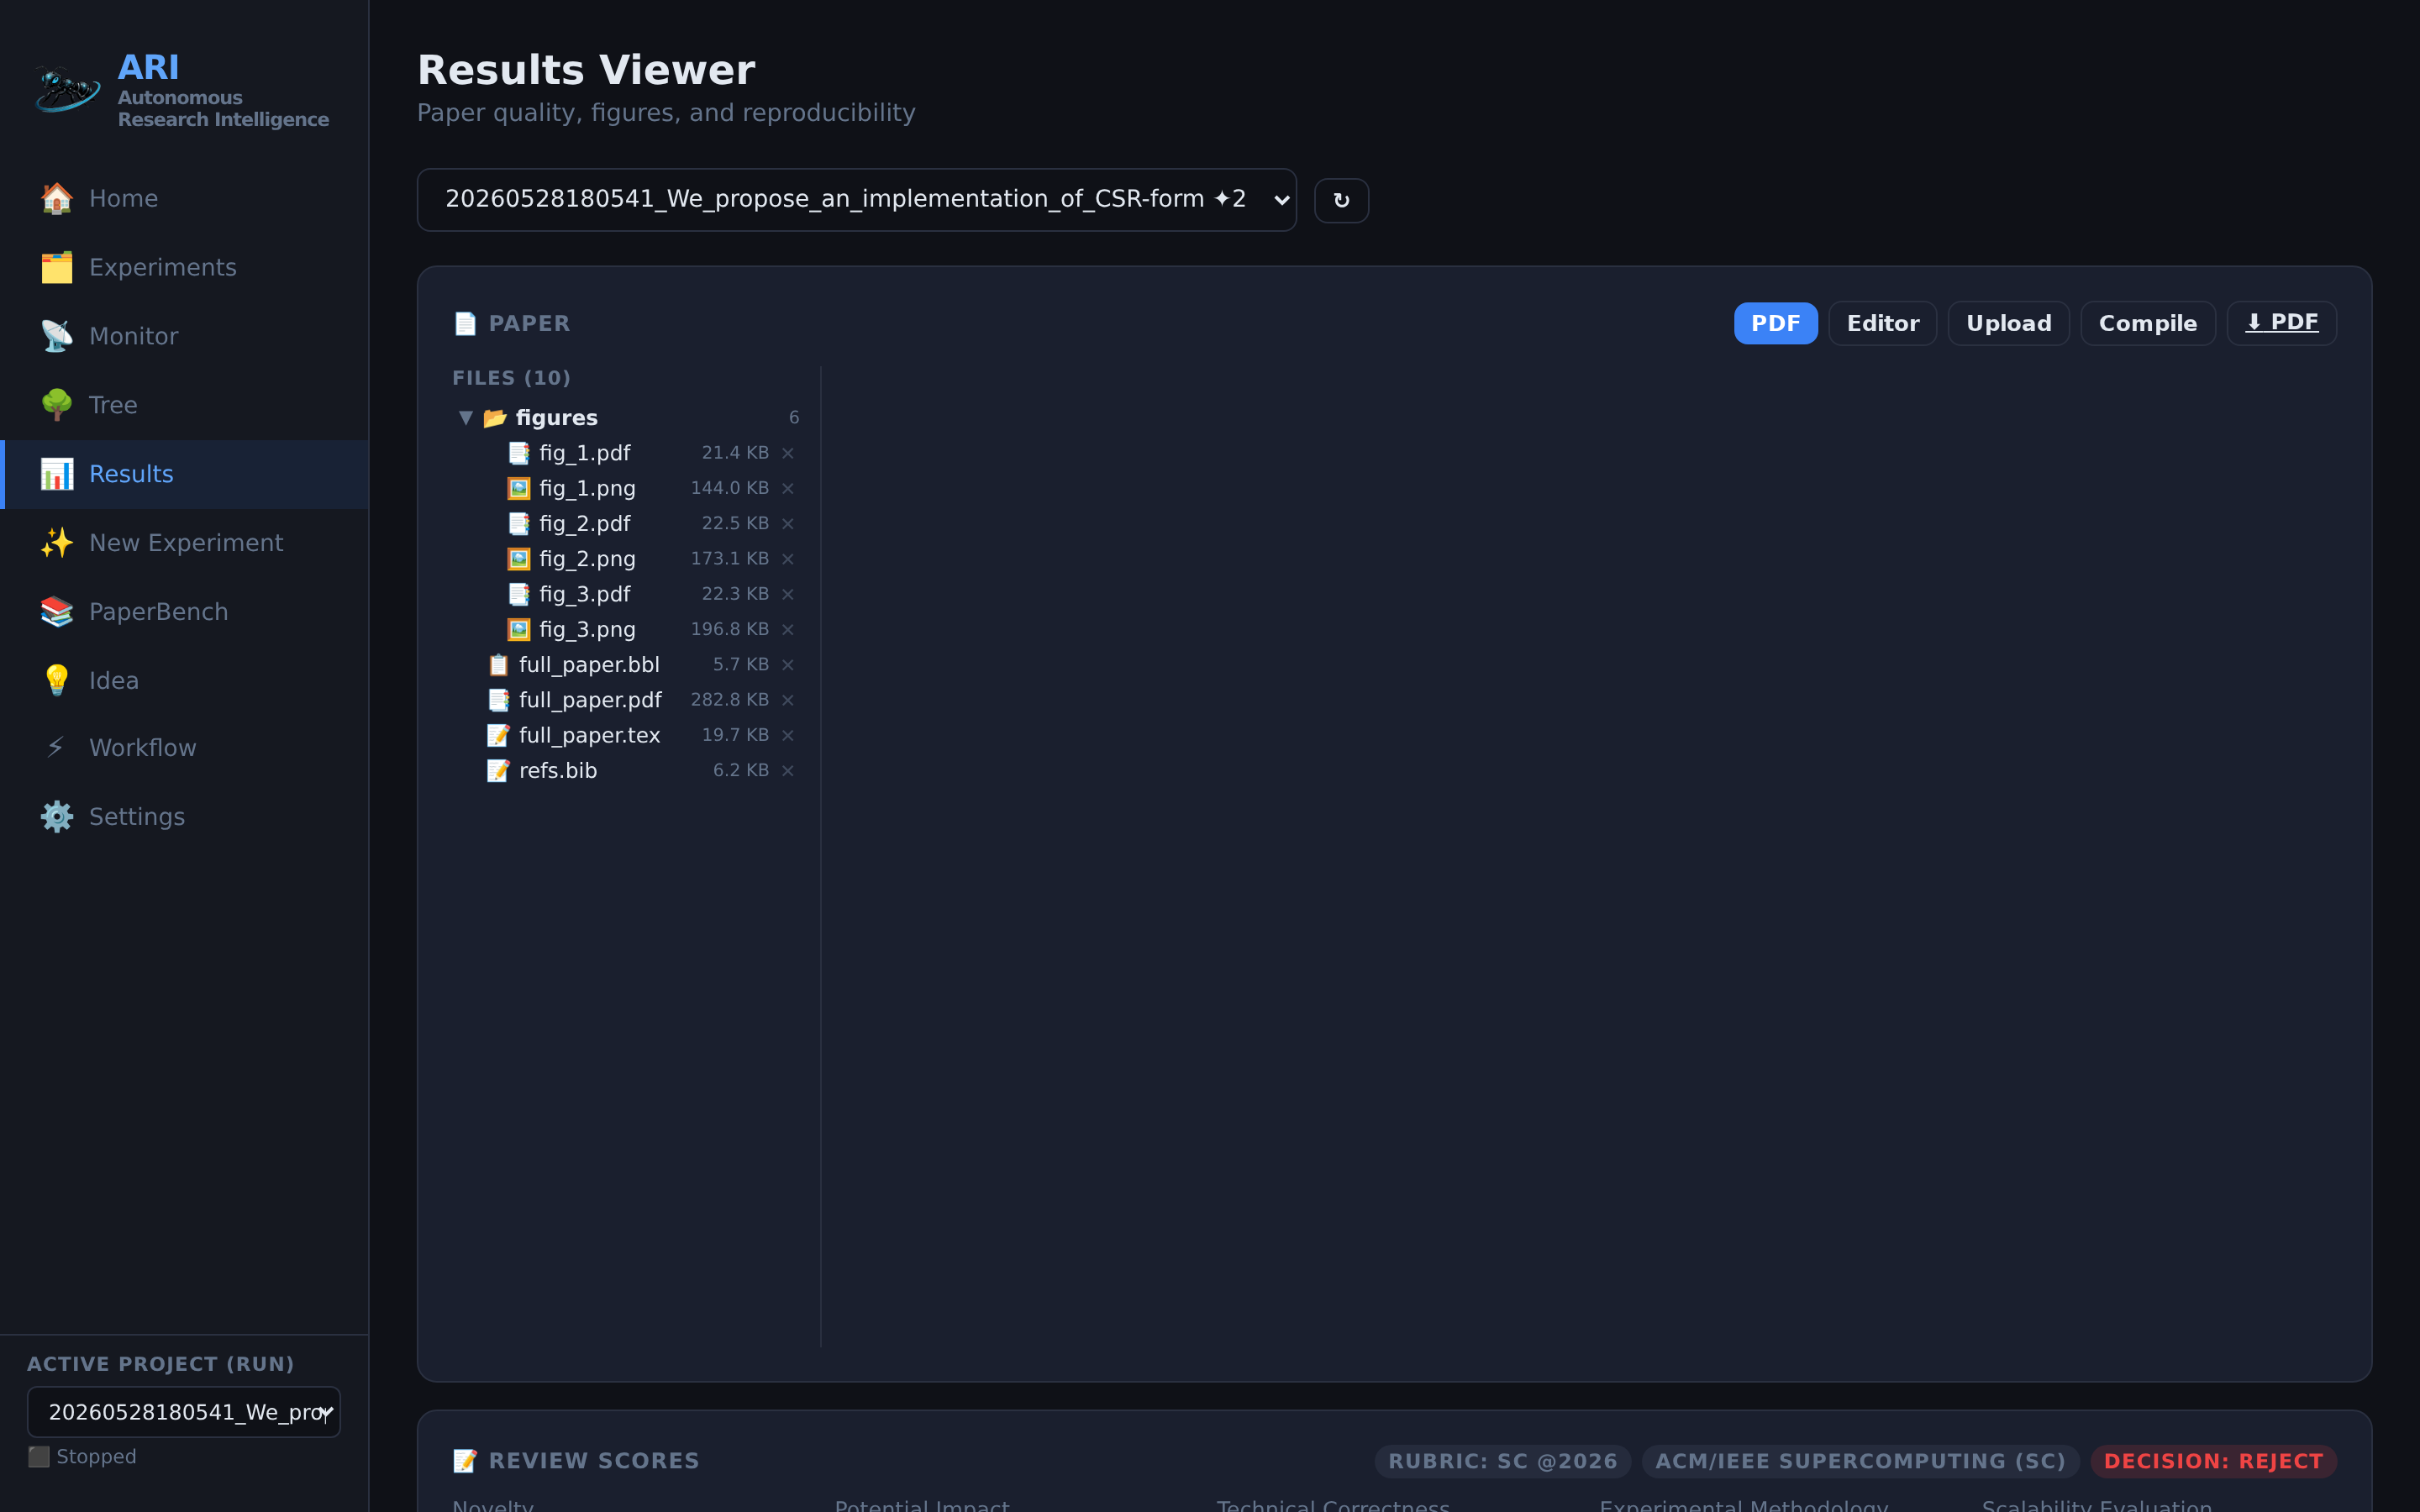
Here you can:
- Edit the paper with the built-in Overleaf-like LaTeX editor (edit
.tex/.bibfiles, compile, and preview PDF inline) - View the automated peer review score and feedback
- Browse the Experiment Artifact Repository (EAR) with code, data, and reproducibility metadata
- Check the reproducibility verification report
- Download all artifacts
Output files are saved in ./checkpoints/<run_id>/:
| File | Description |
|---|---|
full_paper.tex / .pdf | Complete generated paper |
review_report.json | Peer review score and feedback (incl. ensemble reviews + meta-review when N>1) |
reproducibility_report.json | Independent reproducibility verification |
tree.json | Full experiment tree with all metrics |
science_data.json | Cleaned data (no internal terms) |
figures_manifest.json | Generated figures |
ear/ | Experiment Artifact Repository (code, data, logs, reproducibility metadata) |
experiments/ | Per-node source code and output |
Step 7: Configure Settings
Open the Settings page to customize ARI:
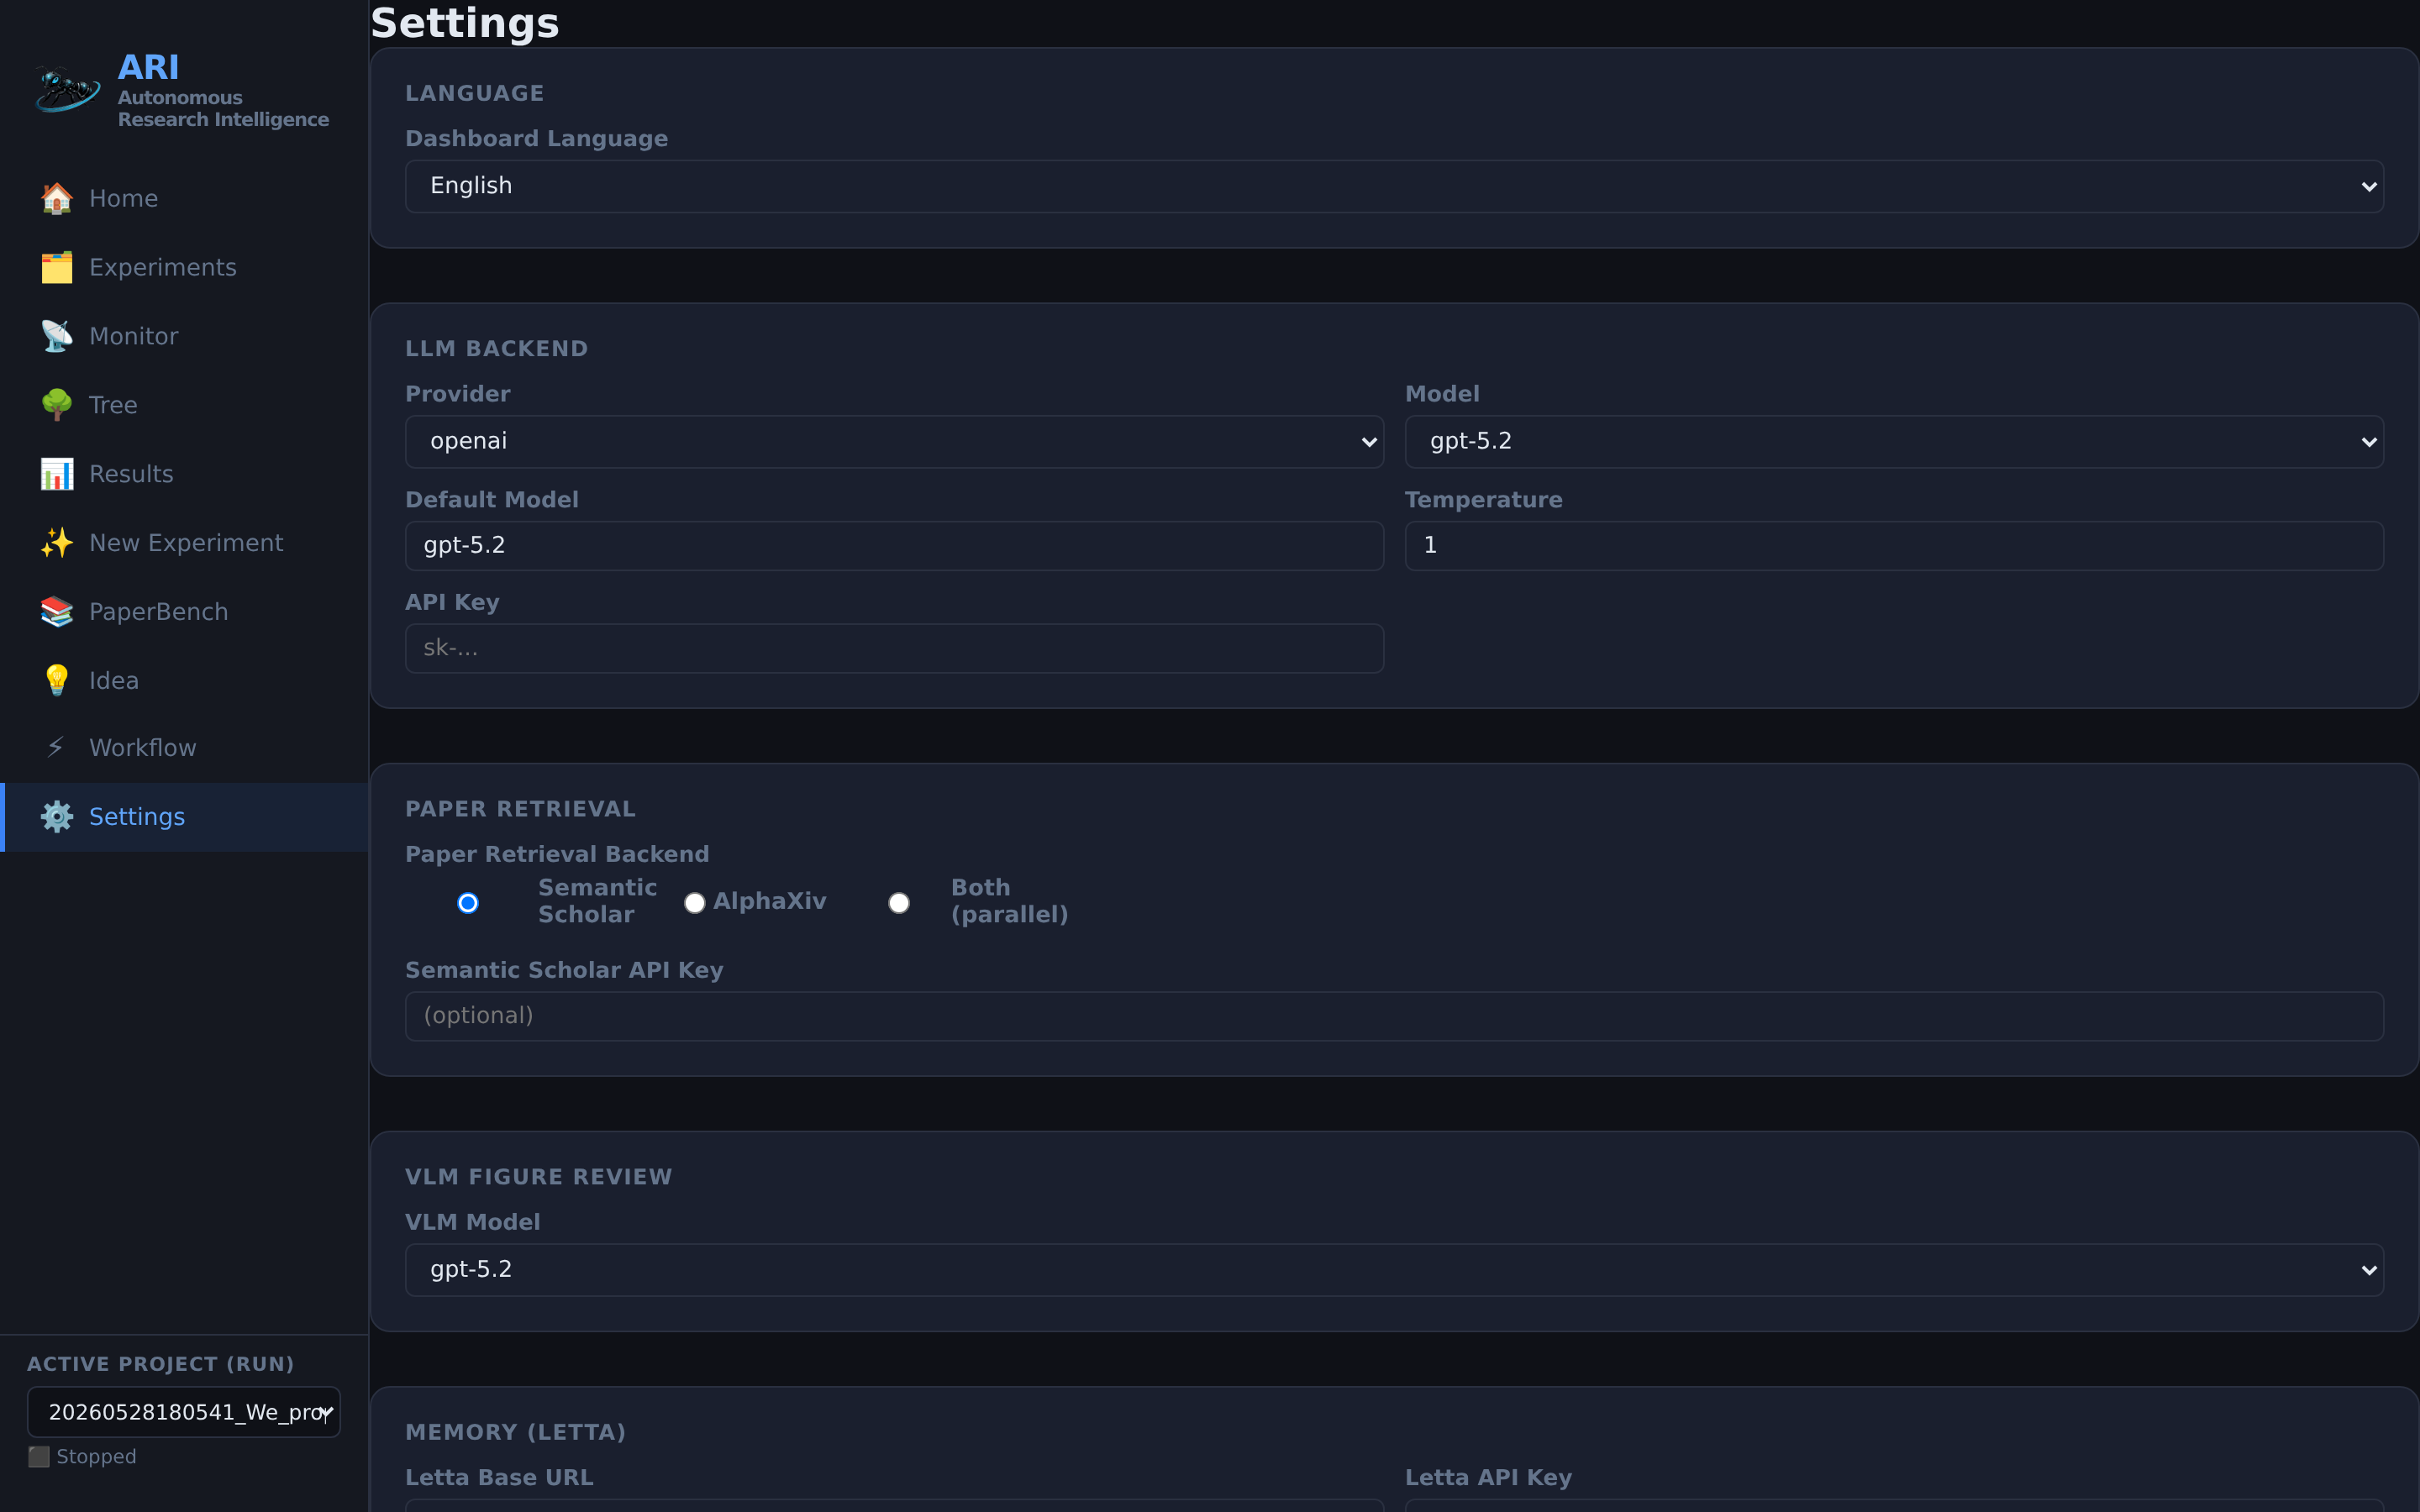
Dashboard Language
Change the dashboard language (English, Japanese, Chinese) from the language dropdown at the top.
LLM Backend
- Choose your provider (OpenAI, Anthropic, Ollama, Custom)
- Set the default model and temperature
- Enter your API key (stored locally, masked in the UI)
Paper Search
- Optionally set a Semantic Scholar API key for higher rate limits
SLURM / HPC
- Set default partition, CPU count, and memory for cluster jobs
- Click Detect to auto-detect your cluster's available partitions
Container Runtime
- Choose container mode: auto, Docker, Singularity, Apptainer, or none
- Set container image and pull policy (always / on_start / never)
- Click Detect Runtime to auto-detect available container runtimes
VLM Figure Review
- Set the VLM model for figure quality review (default:
openai/gpt-4o) - Configure review threshold and max iterations
Retrieval Backend
- Choose paper search backend: Semantic Scholar (default), AlphaXiv, or both (parallel)
Per-Phase Model Overrides
Use different models for different pipeline phases (e.g., a cheaper model for idea generation, a better model for paper writing).
Additional Dashboard Pages
Ideas Page
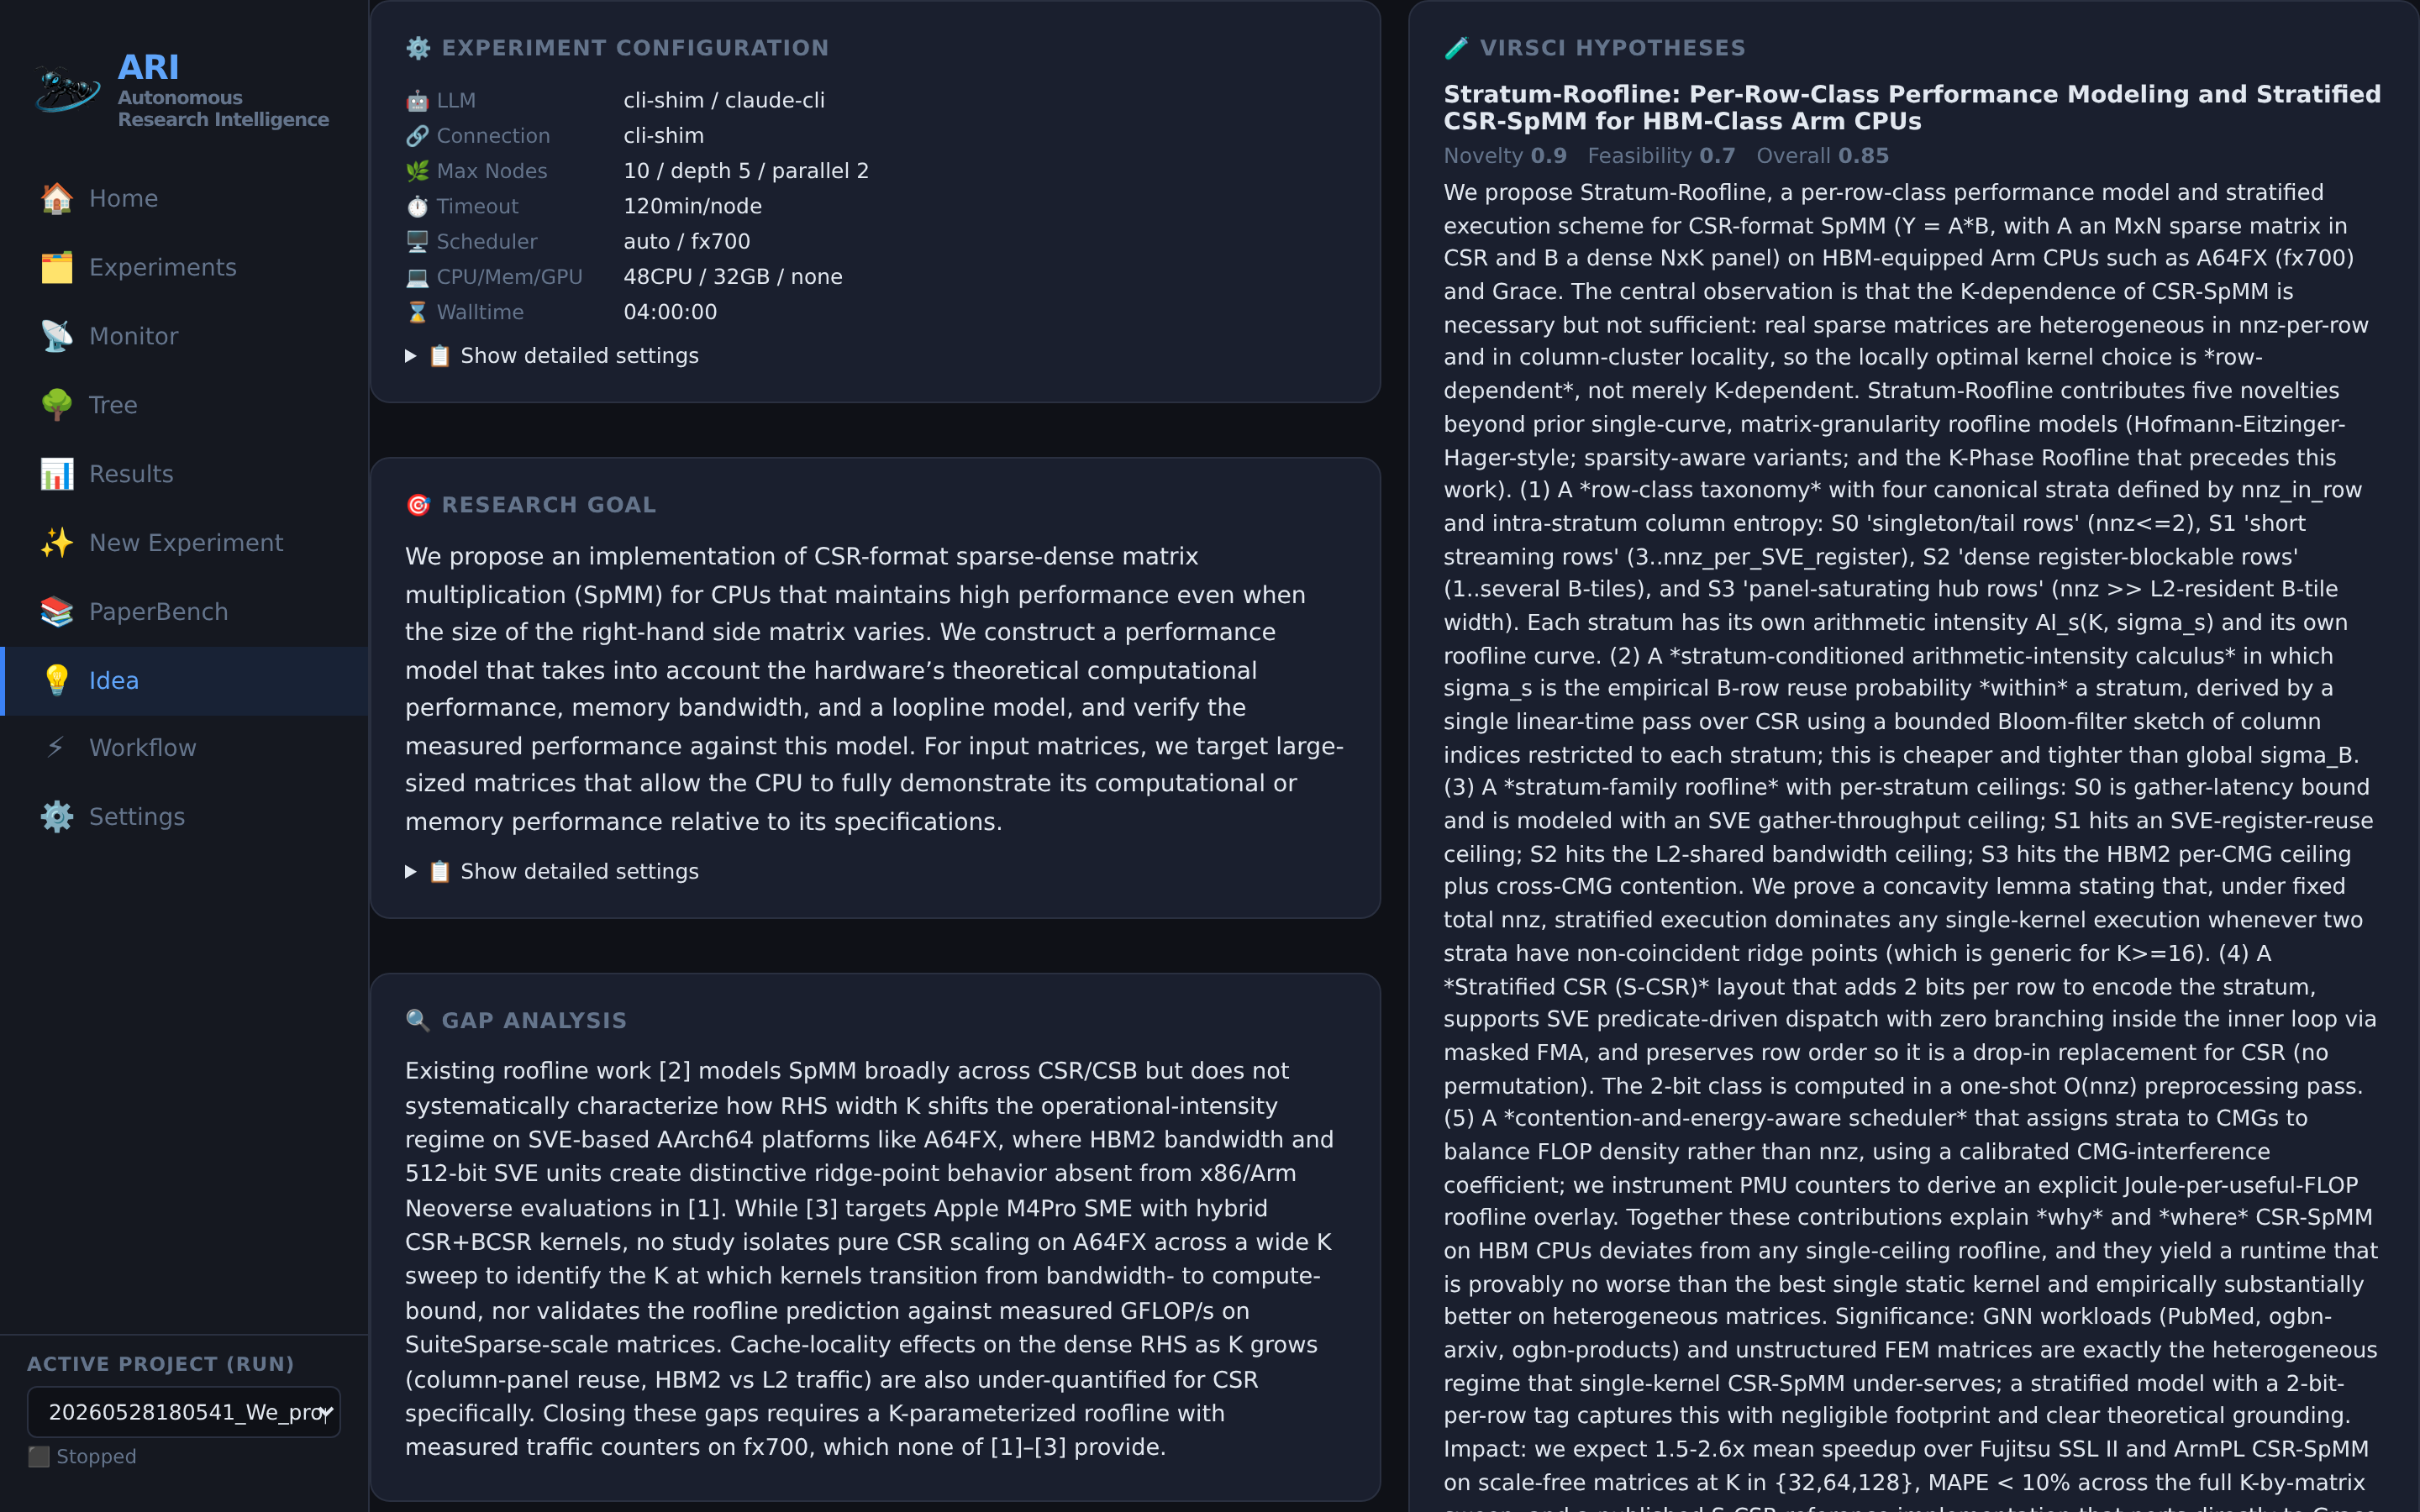
View VirSci-generated research hypotheses with novelty and feasibility scores. See the experiment configuration, research goal, and BFTS node evaluations.
Workflow Editor
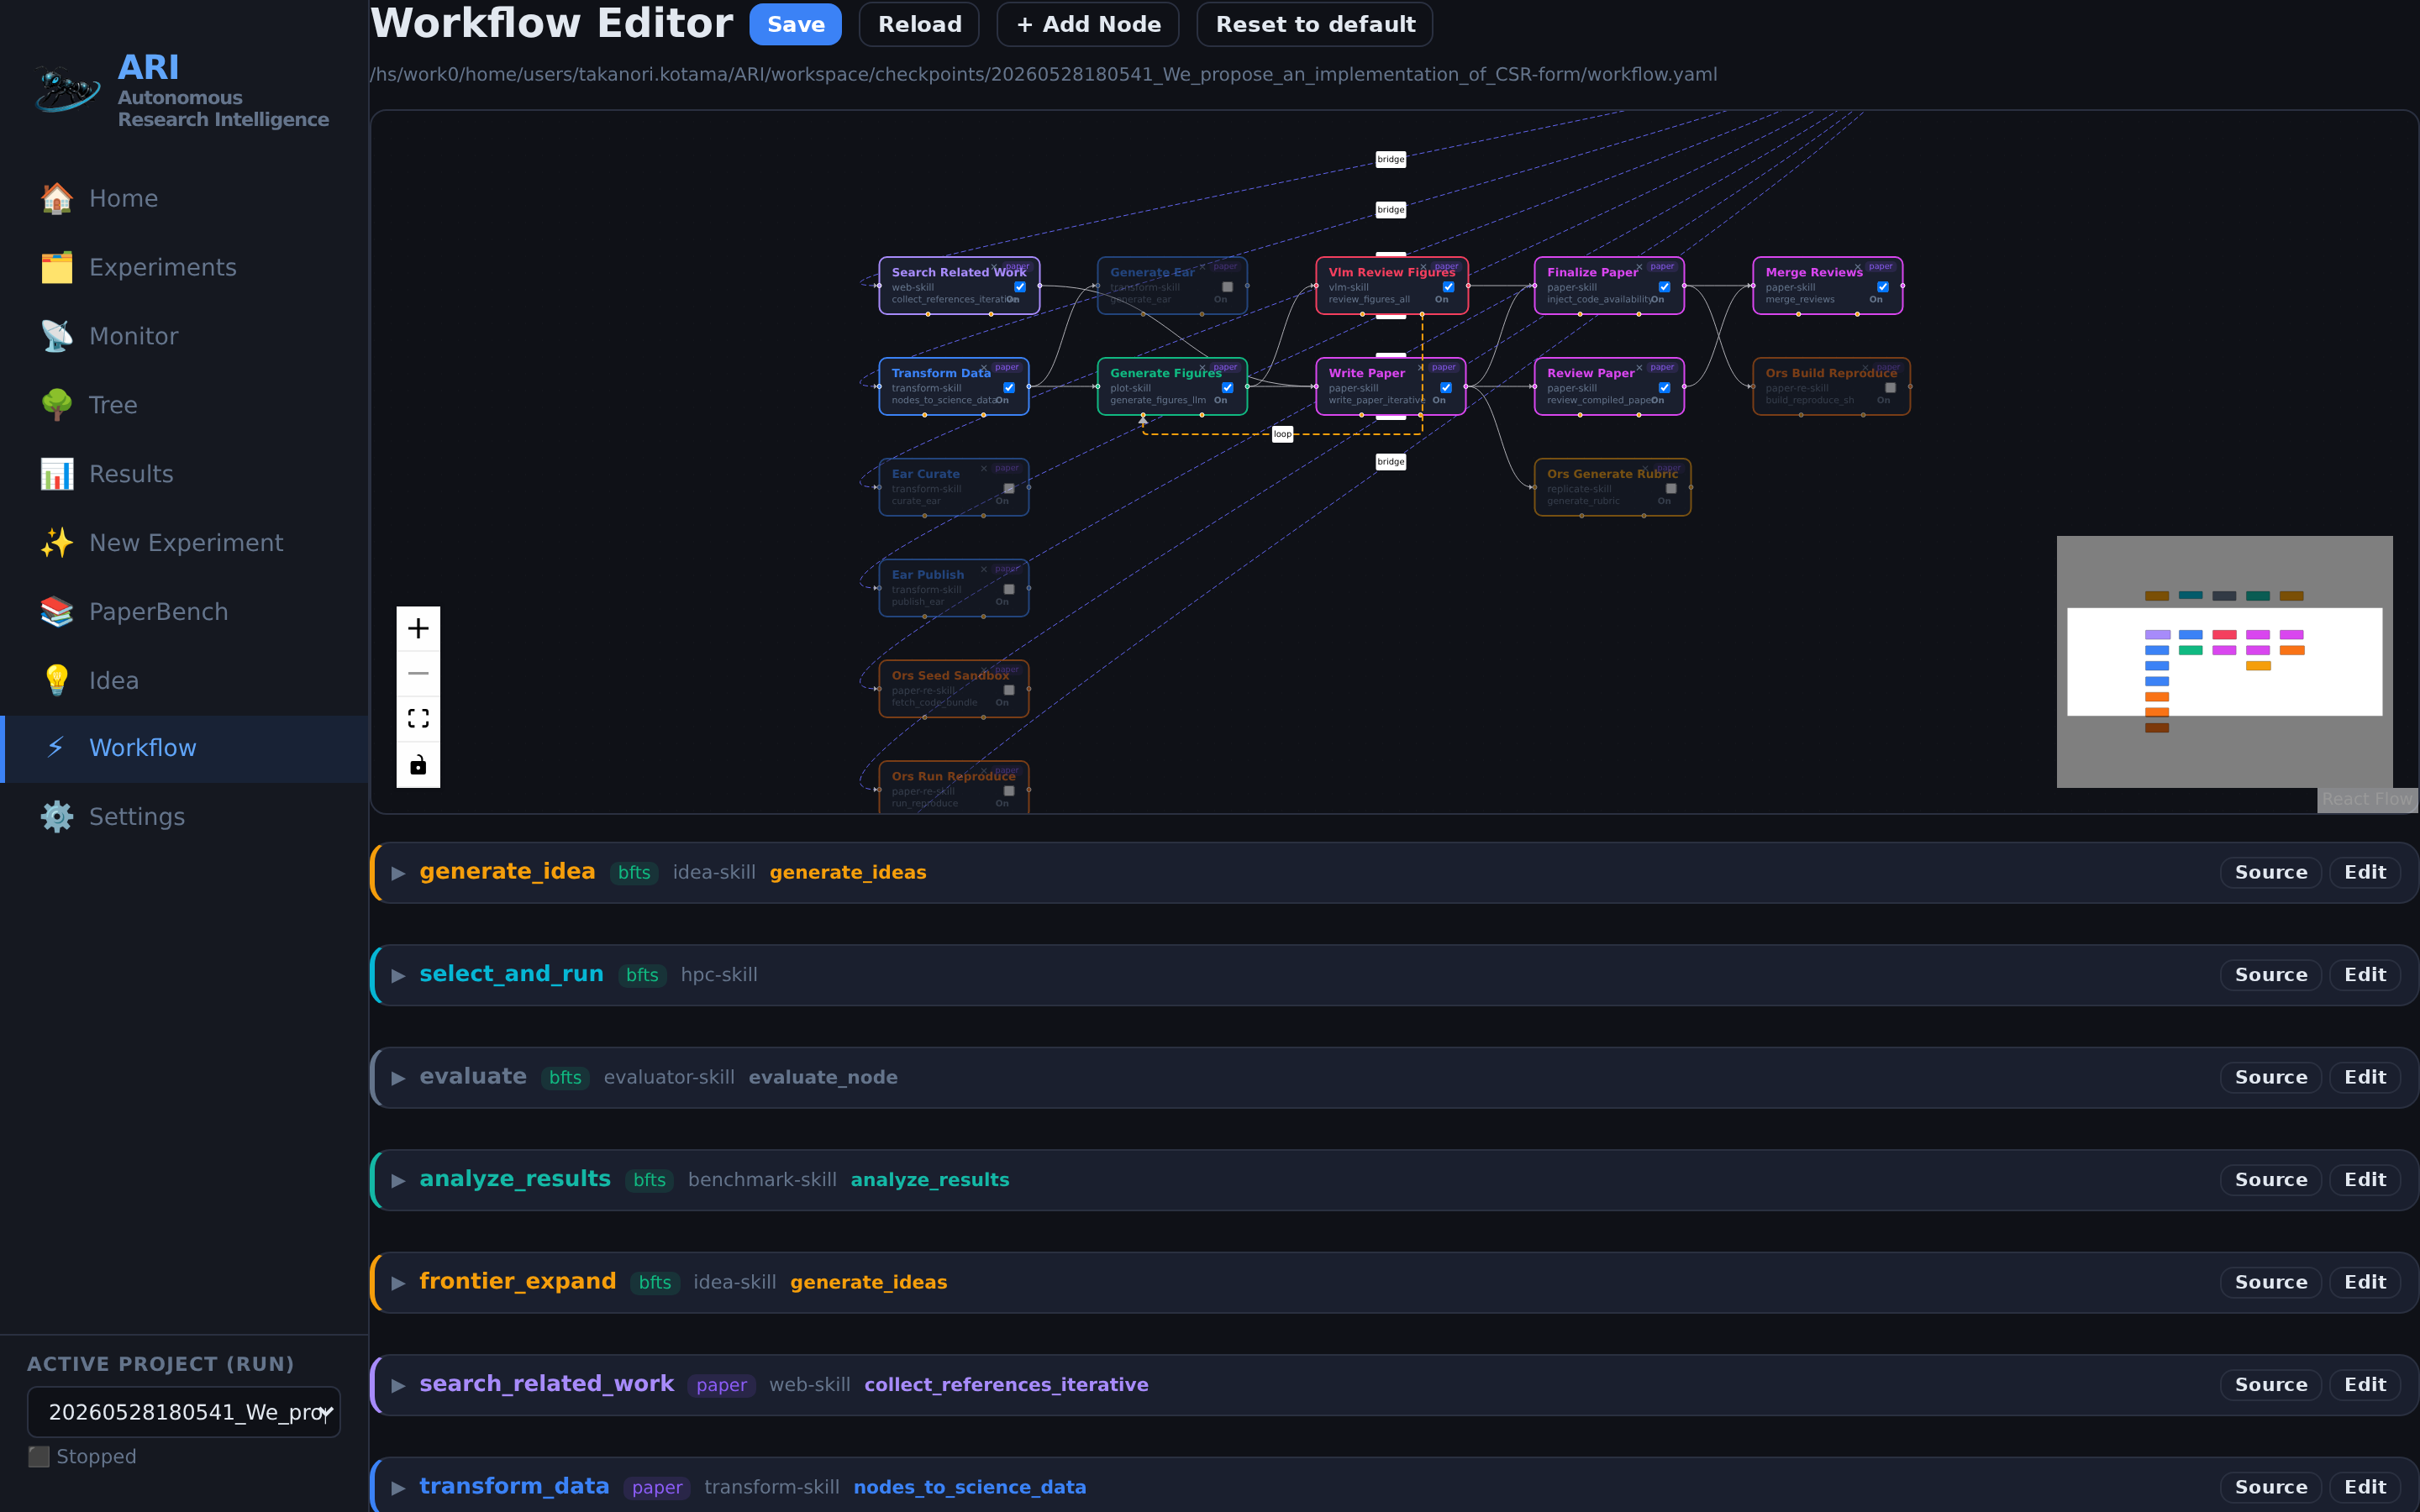
A React Flow visual DAG editor for the post-BFTS pipeline. Drag nodes, draw edges, enable/disable stages, and assign skills. Swim-lane layout separates BFTS and Paper phases. Changes are saved as workflow.yaml.
Dashboard Architecture & API
The dashboard is a React/TypeScript SPA (built with Vite) served by a Python asyncio HTTP server. It consists of two components:
- HTTP server (
ari/viz/server.py): REST API + SSE log streaming on the main port - WebSocket server: Real-time tree updates on port+1 (e.g., 8766 if dashboard is on 8765)
API Endpoints
All endpoints are accessible at http://localhost:<port>/.
State & Monitoring
| Endpoint | Method | Description |
|---|---|---|
/state | GET | Full application state: current phase (idle/idea/bfts/paper/review), node counts, experiment config, cost data, LLM model info |
/api/logs | GET (SSE) | Server-Sent Events stream of real-time logs from ari.log and cost_trace.jsonl |
/memory/<node_id> | GET | Memory store entries for a node (tool-call trace, metrics, parent chain) |
/codefile?path=<path> | GET | Read a file from the checkpoint directory (restricted to checkpoint bounds, max 2MB) |
Experiment Management
| Endpoint | Method | Description |
|---|---|---|
/api/launch | POST | Launch new experiment. Body: {experiment_md, profile, model, provider, max_nodes, max_depth, max_react, timeout_min, workers, partition, ...}. Returns {ok, pid, checkpoint_path} |
/api/run-stage | POST | Run a specific stage: {stage: "resume"/"paper"/"review"} |
/api/stop | POST | Gracefully stop running experiment (SIGTERM → SIGKILL fallback) |
/api/checkpoints | GET | List all checkpoint directories with status, node count, review score |
/api/checkpoint/<id>/summary | GET | Detailed summary: tree data, review, science data, paper text |
/api/checkpoint/<id>/paper.pdf | GET | Download generated PDF |
/api/checkpoint/<id>/paper.tex | GET | Download generated LaTeX |
/api/active-checkpoint | GET | Current active checkpoint path |
/api/switch-checkpoint | POST | Switch active checkpoint: {path} |
/api/delete-checkpoint | POST | Delete checkpoint and associated logs: {path} |
/api/upload | POST | Upload file to active checkpoint (binary body, X-Filename header) |
Configuration
| Endpoint | Method | Description |
|---|---|---|
/api/settings | GET | Current settings: LLM provider/model, Ollama host, SLURM config, MCP skills |
/api/settings | POST | Save settings to {checkpoint}/settings.json and .env (requires an active project). Body: {llm_model, llm_provider, ollama_host, slurm_partition, ...} |
/api/env-keys | GET | All API keys from .env files with source info |
/api/env-keys | POST | Save a single API key: {key, value} |
/api/profiles | GET | Available environment profiles (laptop, hpc, cloud) |
/api/models | GET | Available LLM providers and models |
/api/workflow | GET | Full workflow.yaml with pipeline stages and skill metadata |
/api/workflow | POST | Save modified workflow.yaml: {path, pipeline} |
/api/skills | GET | List available MCP skills with descriptions |
/api/skill/<name> | GET | Skill details: README, SKILL.md, server.py source |
Wizard & Tools
| Endpoint | Method | Description |
|---|---|---|
/api/chat-goal | POST | Multi-turn LLM chat for experiment goal refinement: {messages, context_md} |
/api/config/generate | POST | Generate experiment.md from natural language goal: {goal} |
/api/ssh/test | POST | Test SSH connectivity: {ssh_host, ssh_port, ssh_user, ssh_key, ssh_path} |
/api/scheduler/detect | GET | Auto-detect compute environment (SLURM, PBS, LSF, Kubernetes) |
/api/slurm/partitions | GET | Available SLURM partitions |
/api/ollama-resources | GET | GPU info (nvidia-smi), available Ollama models |
/api/gpu-monitor | GET/POST | Start/stop GPU monitor daemon |
WebSocket
| Endpoint | Description |
|---|---|
ws://localhost:<port+1>/ws | Subscribe to real-time tree updates. Messages: {type: "update", data: tree.json, timestamp} |
Security
- API keys are stored in
.envfiles only, never insettings.json - File access (
/codefile) is restricted to the checkpoint directory - Each experiment runs in its own process group for isolation
CLI Alternative
All dashboard operations can also be performed from the command line:
Running Experiments
# Basic run (auto-detects config)
ari run experiment.md

# With environment profile
ari run experiment.md --profile hpc

# With custom config
ari run experiment.md --config ari-core/config/workflow.yaml

# Resume interrupted run
ari resume ./checkpoints/20260328_matrix_opt/

# Run paper pipeline only (experiments already done)
ari paper ./checkpoints/20260328_matrix_opt/
Monitoring & Results
# Show node tree and status
ari status ./checkpoints/20260328_matrix_opt/

# List all projects
ari projects

# Show detailed results (tree + review)
ari show 20260328_matrix_opt

# List available tools
ari skills-list
Configuration
# View current settings
ari settings

# Change model
ari settings --model openai/gpt-4o

# Set SLURM options
ari settings --partition gpu --cpus 64 --mem 128
Environment Variables
| Variable | Description | Default |
|---|---|---|
ARI_BACKEND | LLM backend: ollama / openai / anthropic | ollama |
ARI_MODEL | Model name (e.g., qwen3:8b, openai/gpt-4o) | qwen3:8b |
OPENAI_API_KEY | OpenAI API key | — |
ANTHROPIC_API_KEY | Anthropic API key | — |
OLLAMA_HOST | Ollama server URL | http://localhost:11434 |
ARI_MAX_NODES | Maximum total experiments | 50 |
ARI_PARALLEL | Concurrent experiments | 4 |
ARI_MAX_REACT | Max ReAct steps per node | 80 |
ARI_TIMEOUT_NODE | Timeout per node (seconds) | 7200 |
Troubleshooting
Installation
| Problem | Solution |
|---|---|
ari: command not found | Add ~/.local/bin to your PATH: export PATH="$HOME/.local/bin:$PATH" |
| Setup script fails | Check Python version: python3 --version (must be 3.10+) |
| Permission denied | Don't use sudo. Run as your normal user. |
AI Model
| Problem | Solution |
|---|---|
| Ollama connection refused | Make sure ollama serve is running in another terminal |
LLM Provider NOT provided | Use provider prefix: openai/gpt-4o, not just gpt-4o |
| Slow or timeout | Use a smaller model (qwen3:8b) or increase timeout in Settings |
Experiment
| Problem | Solution |
|---|---|
| All nodes failed | Open Tree view, click a failed node, check the Trace tab |
| No results | Check Monitor page — the experiment may still be running |
| Interrupted run | Go to Experiments page, find the run, click Resume |
Paper Generation
| Problem | Solution |
|---|---|
| No PDF generated | Install LaTeX: conda install -c conda-forge texlive-core |
No paper text available | Install: pip install pymupdf pdfminer.six |
Quick Start Recipe
# 1. Install
git clone https://github.com/kotama7/ARI.git && cd ARI && bash setup.sh

# 2. Set up AI (free, local)
ollama pull qwen3:8b && ollama serve &
export ARI_BACKEND=ollama ARI_MODEL=qwen3:8b

# 3. Launch all services (Letta + registry + GUI on :8765)
./start.sh
# Open http://localhost:8765 and use the wizard to create your experiment!
# Stop with: ./shutdown.sh
Next Steps
- Understand what just happened: Your first experiment, end to end walks the full goal → search → paper → reproduce pipeline and explains why each stage exists.
- Hit a snag? The FAQ covers the common first-run questions, and the Glossary defines every recurring term.
- CLI usage: See CLI Reference for command-line operations
- Experiment files: See Writing Experiment Files for advanced syntax
- HPC clusters: See HPC Setup Guide for SLURM configuration
- Extending ARI: See Extension Guide for adding new skills